
Suchite Home Improvement
WE SERVE ALL CONNECTICUT SHORELINE
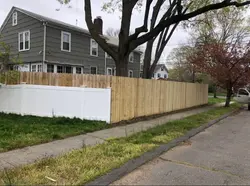
Some of Our Recent Projects
 |  |  |
|---|---|---|
 |  |
Vinyl Fence
We are your reliable partner for comprehensive home enhancement solutions. We specialize in a range of services, including professional vinyl fence installations that enhance both the aesthetic appeal and security of your property. Our to high-quality workmanship and exceptional customer service ensures complete satisfaction throughout the entire process. Allow us to assist in transforming your home into the space have always envisioned.

Proper installation is crucial for ensuring the fence's stability, durability, and aesthetic appeal, it ensures proper alignment and security.

Durability & Versatility
Residential vinyl fences are a popular choice as they resist rot, warping, and pests. They are also a cost-effective choice in the long run,
We Work with You the Whole Process
Defining Your Vinyl Limits
Vinyl fence installation involves planning, marking the layout, and digging post holes to the correct depth before setting posts in concrete. Next, attach the horizontal rails, slide in the panels, and secure the top rails and post caps. Finally, install gates and perform a thorough clean-up.
1. Plan and prepare
-
Call utility companies: Before digging, contact the local utility marking service to locate and mark any underground lines.
-
Mark the layout: Use stakes and a taut string line to mark the fence line, corners, and gate locations.
-
Clear the area: Mow the grass and clear weeds from the fence line to ensure a clean workspace.
-
Check regulations: Review local zoning ordinances and obtain any necessary permits.


2. Dig and set posts
-
Dig post holes: Dig holes for each post, typically 30–36 inches deep and 10 inches in diameter. The holes should be deep enough to go below the frost line.
-
Add a gravel base: Place a few inches of gravel at the bottom of each hole for drainage and to help support the post.
-
Set posts: Place the posts in the holes, using the string line to ensure they are plumb and aligned.
-
Pour concrete: Mix and pour quick-setting concrete into the holes around the posts, ensuring it reaches a level just below the ground.
-
Brace and cure: Brace the posts to keep them plumb while the concrete cures. Allow the concrete to set completely, often overnight, before proceeding.

3. Assemble the fence panels
-
Attach bottom rails: Connect the bottom horizontal rails to the posts.
-
Slide in panels: Slide the vinyl fence panels into the pre-cut channels on the posts and rails.
-
Secure top rails: Attach the top rails to complete the structure and secure the panels in place.
-
Install post caps: Place post caps on top of each post for a finished look.
Let's Work on Your Vinyl Fence

Privacy
Solid panels fence provides a complete visual and noise barrier. This type blocks the view from outside and creates a secluded space for you.

Semi-Private
A middle-ground option with spaced-out pickets, lattice, or open panels to provide some privacy while allowing light and air through.

Traditional
This type of fence features a simple, clean design with a flat top, suitable for both modern and classic homes.

Contemporary
Contemporary fences are the most popular and least expensive. Often refers to styles with modern designs.
Vinyl Fence FAQs
What do I wish I knew before remodeling my kitchen? * You'll Have No Kitchen for a Very Long Time. * Subfloor Should be Replaced. * Insulation Will be in Bad Shape. * Experts Get It Wrong Sometimes. * Packaging Is Endless. * Electrical System Isn't Set in Stone. * Cabinet Assembly Is a Huge Project * Kitchen Drywall Work Is Relatively Easy
What is the most expensive part of redoing a kitchen? Custom cabinetry is probably the most expensive part of the kitchen remodel and can average up to $30,000 depending on the make, quality, model, and use. Cabinetry is an essential aesthetic to your kitchen. It can “make or break” your kitchen, and should be a majority of the portion of your budget.
Is $30,000 enough for a kitchen remodel? Yes, $30,000 can be enough for a kitchen remodel, particularly for a smaller or mid-size kitchen or if you're willing to use budget-friendly materials and focus on functional upgrades rather than luxury ones. However, for a large or luxury remodel, or one involving significant structural changes, $30,000 may be insufficient. The feasibility depends on your kitchen's size, the scope of work, material choices, and whether you're doing any of the work yourself
In what order should a kitchen remodel be done? * Set Up a Temporary Kitchen. Time: 1-2 days. * Demolition & Clean Out. Time: 1-2 weeks for smaller projects, up to 6 weeks for larger projects. * Contractor Work Begins. Time: 1-3 weeks. * Installing Floors and Cabinets. * Installing Countertops and Appliances. * Painting and Cleaning.
What is the 3x4 kitchen rule? The "3x4 kitchen rule" is a design guideline suggesting you should have three separate countertop areas, each at least four feet long, to create zones for the main cooking stages: food prep, cooking, and cleaning. The goal is to create an efficient workflow by placing these countertop spaces near the three main appliances: the refrigerator, stove, and sink. It's also a way to incorporate the related concept of the "work triangle," which focuses on minimizing steps between these key appliances
What kitchen design never goes out of style? The classic white kitchen is sometimes criticized for being boring—but it will never go out of style! According to Houzz, 43 percent of renovating homeowners opt for white cabinets. This trend includes brand new cabinets painted white as well as reusing existing cabinets with a white paint “facelift”.
What comes first, countertop or backsplash? If you mishandle the seams, your project could become an eyesore. If you install the backsplashes first, the spacing between these two can become wonky, making sealing the seam more difficult. Installing the counters first allows you greater control and flexibility over the seams
What is the 60 30 10 rule for kitchens? The 60-30-10 rule for a kitchen is a color design principle where you use three colors in a 60% dominant, 30% secondary, and 10% accent ratio to create a balanced and cohesive color scheme. For example, you might use a neutral color for the walls and cabinets (60%), a complimentary color for the countertop and backsplash (30%), and a bold accent color for smaller items like hardware or accessories (10%)
Get a Quote
This is a Paragraph. Click on "Edit Text" or double click on the text box to start editing the content.