
Suchite Home Improvement
WE SERVE ALL CONNECTICUT SHORELINE


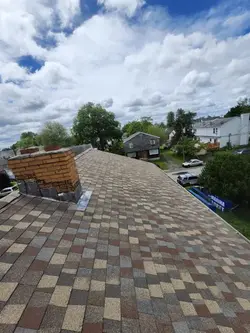


Roofing & Siding
At Suchite Home Improvement, we specialize in transforming your dreams into a reality. Our team of experts offers top-notch roofing and siding that enhance both the aesthetic and functionality of your property. With a commitment to quality craftsmanship and customer satisfaction, we ensure that every project is completed to highest standards. Trust us to elevate your home's appeal and value with our reliable and professional services.

Roofing & Re-Roofing
Our roofing and re-roofing services provide accurate quotes and ensure professional results that stand the test of time. Trust us to protect your home.

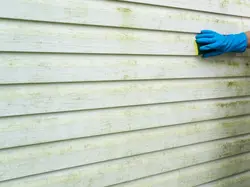
Siding
Our service provides expert siding removal and installation to enhance your home’s beauty. Choose our team for quality workmanship.
Roofing & Siding Done Right!
We start from the begging.
Proper residential roofing involves initial preparation like permits and site protection, followed by the installation process which includes removing the old roof, inspecting and repairing the deck, installing drip edges and underlayment, installing the shingles and flashing, and ensuring proper attic ventilation. The final steps are cleanup and a final inspection to ensure quality and code compliance
Roofing Installation Procedures
Pre-installation
-
Permits and permissions: Obtain any necessary permits from local authorities before beginning work.
-
Home and site protection: Cover exterior items like landscaping, AC units, and decks. Mow the lawn and mark sprinkler heads to protect them.
-
Old roof removal: Tear off all old roofing materials, including shingles and underlayment, and inspect the roof deck for damage or rot.
-
Deck repair: Repair or replace any damaged sections of the roof deck. Hammer down or remove any protruding nails.

Post-installation
-
Cleanup: Remove all debris from the roof and the property, and dispose of it properly.
-
Final inspection: Conduct a final inspection to ensure all materials are installed correctly, all fasteners are secure, and the roof is compliant with all local building codes.
Installation
-
Drip edge: Install drip edge flashing along the eaves and rakes to direct water away from the fascia.
-
Underlayment: Roll out and secure the underlayment, starting from the bottom and working up, overlapping each layer. For cold climates, a self-adhering waterproof membrane is often required.
-
Starter shingles: Install a row of starter shingles along the bottom edge of the roof.
-
Shingles: Install shingles, starting from the bottom and working up, staggering seams and overlapping rows according to the manufacturer's instructions.
-
Flashing: Install flashing in valleys and around penetrations like chimneys, vents, and skylights to prevent leaks.
-
Ventilation: Install and maintain proper attic ventilation, such as ridge vents and soffit vents, to help extend the life of the roof and improve energy efficiency.

Siding Installation Procedures
Proper siding process.
Procedures involve preparing the substrate by removing old siding and repairing damage, installing a weather-resistant barrier, and then installing the new siding panels with proper flashing, trim, and fasteners. Key steps for vinyl siding include using the right nails, not driving them too tightly, and ensuring panels can move freely for expansion and contraction
1. Preparation
-
Remove old siding: Safely remove old siding, inspect the underlying substrate for rot or damage, and repair any issues before proceeding.
-
Clean and repair: Clean the wall surface and repair any damaged sheathing or framing to ensure a smooth, level base.
-
Apply weather barrier: Install a weather-resistive barrier, like house wrap or felt paper, to protect against moisture and air leaks.
-
Install flashing: Install flashing around windows, doors, and at the base to direct water away from the home.

3. Finishing touches
-
Seal edges: Seal gaps around windows and doors with appropriate caulk, but do not caulk where siding panels meet corner posts or J-channels.
-
Final inspection: Conduct a final inspection to ensure panels are straight, secure, and properly installed.
-
Clean up: Clean the work area thoroughly, removing any debris and stray nails.
2. Installation
-
Install starter strip: Begin by installing a starter strip along the bottom of the wall to provide a secure base for the first course of siding.
-
Install corner and trim pieces: Install inside and outside corner posts and trim around windows and doors, leaving the recommended clearance for expansion.
-
Install siding panels: Start from the bottom and work your way up, ensuring each panel is properly locked and overlapping the one below it.
-
Use proper fasteners: Use the correct type and length of nails or screws for the material. For vinyl siding, use nails that are long enough to penetrate the nailable material by at least
1 1/4 (one and one-fourth) inches.
-
Fasten correctly: Center the fastener in the middle of the nailing slot. Do not drive the fasteners tight against the siding, and do not face-nail.
-
Allow for movement: Ensure panels can move freely from side to side. Leave a minimum of 1 1/4 (one and one-fourth) inches. clearance at all openings and stops

Let's Work on Your Roofing Style

Roofing Materials
The most common are Asphalt, meta, slate, wood shakes, tile (clay),
flat roof (membrane), and/or synthetic materials
Factors to Consider
Important factors before starting your project: Budget, longevity, maintenance, aesthetics and climate.
Let's Work on Your Siding Style

Siding Types
These are the most common: Vinyl, fiber cement, wood, metal, stucco, engineered wood, brick and stone veneer.

Siding Maintenance
Clean regularly, protect form water, manage landscaping, check for damage, avoid deicing salts near.
Roofing & Siding FAQs
Roofing
What are the steps to roofing a house? The steps to roofing a house include removing the old roof and inspecting the deck, installing the drip edge and underlayment, applying flashing and ventilation, installing the new shingles, and finally cleaning up and performing a final inspection. Each step must be completed correctly to ensure the new roof is secure and watertight
Siding
What do you put down before siding on a house? Moisture Protection By installing a house wrap before your siding installation, you can reduce the likelihood of wood rot, mold growth and moisture infiltration in your home
What is the 3 4 5 method for roofing? If the short side of the triangle is 3 feet, and the leg that extends from it 90 degrees is 4 feet, the hypotenuse, or longest leg, will be 5 feet. This technique simply requires that the carpenter create a triangle in the corner of the lines that are to be square (90 degrees) to each other.
How far apart should screws be on corrugated roofing? There will be four screws per screw line placed in the high of the corrugated panel. The screws are spaced out so that every third corrugation has a screw. The diagram above is a typical 37” wide panel and the spacing works out perfectly.
What is a common mistake to avoid during vinyl siding installation? - Improper Surface Preparation. - Choosing the Wrong Material. - Incorrect Moisture Barrier Installation. - Neglecting Proper Overlap. - Inadequate Flashing Around Openings. - Improper Use of Tools and Fasteners. - Ignoring Expansion and Contraction.
Is it better to screw or nail vinyl siding? Screws offer greater holding power and are easier to adjust for a secure but flexible installation, while nails are faster and less expensive, making them a viable option when speed is a priority. For both, it's crucial to not overtighten or hammer them completely flush, leaving a slight gap to allow the siding to expand and contract with temperature changes. Corrosion-resistant fasteners, such as hot-dipped galvanized or aluminum, are necessary for all installations
How to tell if your roof was installed correctly? You can tell if your roof was installed correctly by looking for straight, even shingle lines and checking for no visible leaks or moisture in the attic or ceilings. Other signs of a proper installation include proper flashing around penetrations, correct nail placement, and the absence of multiple layers of shingles
What siding to avoid in a house exterior? Fiber cement is not the most environmentally friendly siding Fiber cement siding is a mixture of cellulose fibers, cement and sand, but it also includes some harmful ingredients, including crystalline silica, which is a carcinogen. Carbon black, also found in this product, is a known carcinogen.
Get a Quote
This is a Paragraph. Click on "Edit Text" or double click on the text box to start editing the content.